Concrete has a way of making small backyard ideas feel satisfyingly permanent. It also has a way of punishing the sentence, "How hard could it be?"
A good weekend concrete project is not the biggest thing you can pour before Monday. It is a project with a small enough scope, clear enough prep, manageable enough weight, and realistic enough curing plan that you are not trying to finish a tiny civil engineering internship with a borrowed wheelbarrow and vibes.
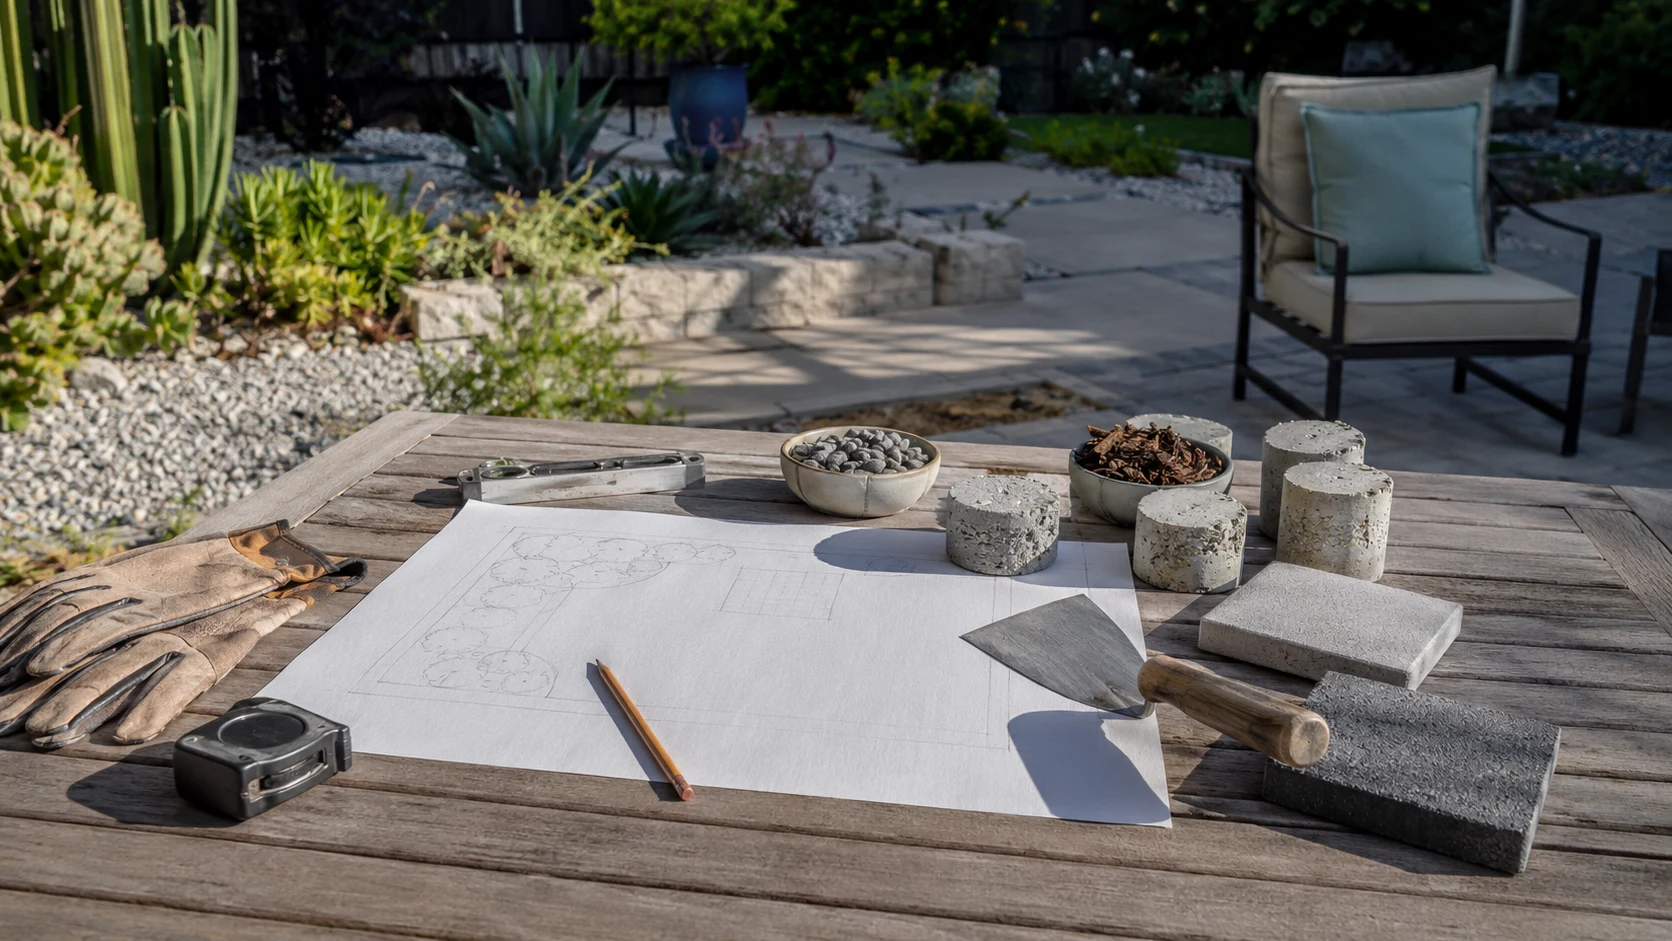
This guide is for homeowner-scale backyard upgrades: stepping stones, planters, small pads, edging concepts, simple paver transitions, small cast tables, and maintenance work. It is not structural engineering advice, a contractor specification, or a permission slip for driveways, retaining walls, gas fire features, attached counters, utilities, or permit-sensitive work.
If you are still learning how concrete behaves, keep Concrete Cure Time for DIY Outdoor Projects and How to Avoid Cracks in Small DIY Concrete Projects open in another tab. They are the guardrails that keep "weekend upgrade" from becoming "expensive gray regret."
Quick Safety Note
Dry cement, silica-containing dust, wet concrete, heavy bags, cutting, grinding, mixing, lifting, and outdoor work all deserve respect.
Wear eye protection, waterproof gloves, and appropriate dust protection when handling dry materials. Avoid breathing concrete dust. Keep wet concrete off your skin. Read the product label and safety data sheet for every mix, pigment, additive, sealer, cleaner, or coating you use. Keep kids and pets away from wet concrete, dust, tools, and curing pieces.
If the project involves structure, load-bearing work, utilities, drainage changes, stairs, retaining walls, vehicles, gas, fire, electrical, plumbing, permits, local code, or anything attached to the house, stop treating it like casual weekend DIY and get qualified help.
The Direct Answer
The best weekend concrete projects are small, useful, and honest about time.
Some projects can be formed, poured, and cleaned up in a weekend, but still need days or weeks before they are ready for full use, sealing, moving, loading, or judging. Other projects are better as weekend planning projects: measure, design, prep, source materials, make a test piece, or repair a small area without pretending the whole backyard will be finished by Sunday dinner.
Think in three categories:
- Completed in a weekend: small repairs, surface cleaning, some sealing maintenance, simple layout planning, and small cast pieces that do not need immediate service.
- Poured or prepped in a weekend, cured later: stepping stones, small planters, small utility pads, edging pieces, and tabletop samples.
- Planned in a weekend, built later: concrete countertops, larger patios, paver landings, drainage-aware hardscape, fire features, and anything that needs help, equipment, permits, or a longer curing and installation sequence.
That distinction is the difference between a satisfying project and a patio that spends the next month explaining your optimism to everyone who visits.
What "Weekend Project" Really Means
Concrete project timing has two clocks.
The first clock is work time: layout, demolition, excavation, form building, mixing, pouring, finishing, cleanup, and protecting the project.
The second clock is concrete time: setting, curing, drying, handling strength, sealing readiness, and return-to-use. Concrete time does not care that your weekend ended. It continues quietly, like an unpaid intern with chemistry homework.
For homeowner planning, "weekend concrete project" can mean:
- You can do the messy work in a weekend.
- You can start the cure over the weekend.
- You can make the forms, molds, or test samples over the weekend.
- You can finish a maintenance task over the weekend.
- You can plan a larger project well enough to avoid making a large mistake.
It should not mean:
- Full-strength concrete by Monday.
- Furniture, vehicles, grills, or heavy loads immediately.
- Sealing before the concrete and product instructions allow it.
- Ignoring base prep because the project is "small."
- Calling something beginner-friendly because the internet made it look cute.
Concrete is not difficult because it is mysterious. It is difficult because it has a lot of boring requirements, and boring requirements are exactly what weekend energy likes to skip.
How To Choose A Weekend-Friendly Concrete Project
Before choosing the project, ask these questions:
- Is the project small enough to mix, place, finish, and clean up without rushing?
- Can you move the materials safely?
- Does the project need excavation, base prep, compaction, drainage, slope, or forms?
- Will it support people, furniture, vehicles, posts, appliances, or anything heavy?
- Does it need to be level, sloped, drained, sealed, or tied into existing hardscape?
- Can the concrete cure undisturbed?
- Can you keep kids, pets, rain, sun, wind, and foot traffic off it?
- Would failure be mostly annoying, or genuinely unsafe and expensive?
If the project can fail harmlessly, it may be a good DIY candidate. If failure affects safety, structure, drainage, fire, utilities, or the house, the project has left the weekend-playground area.
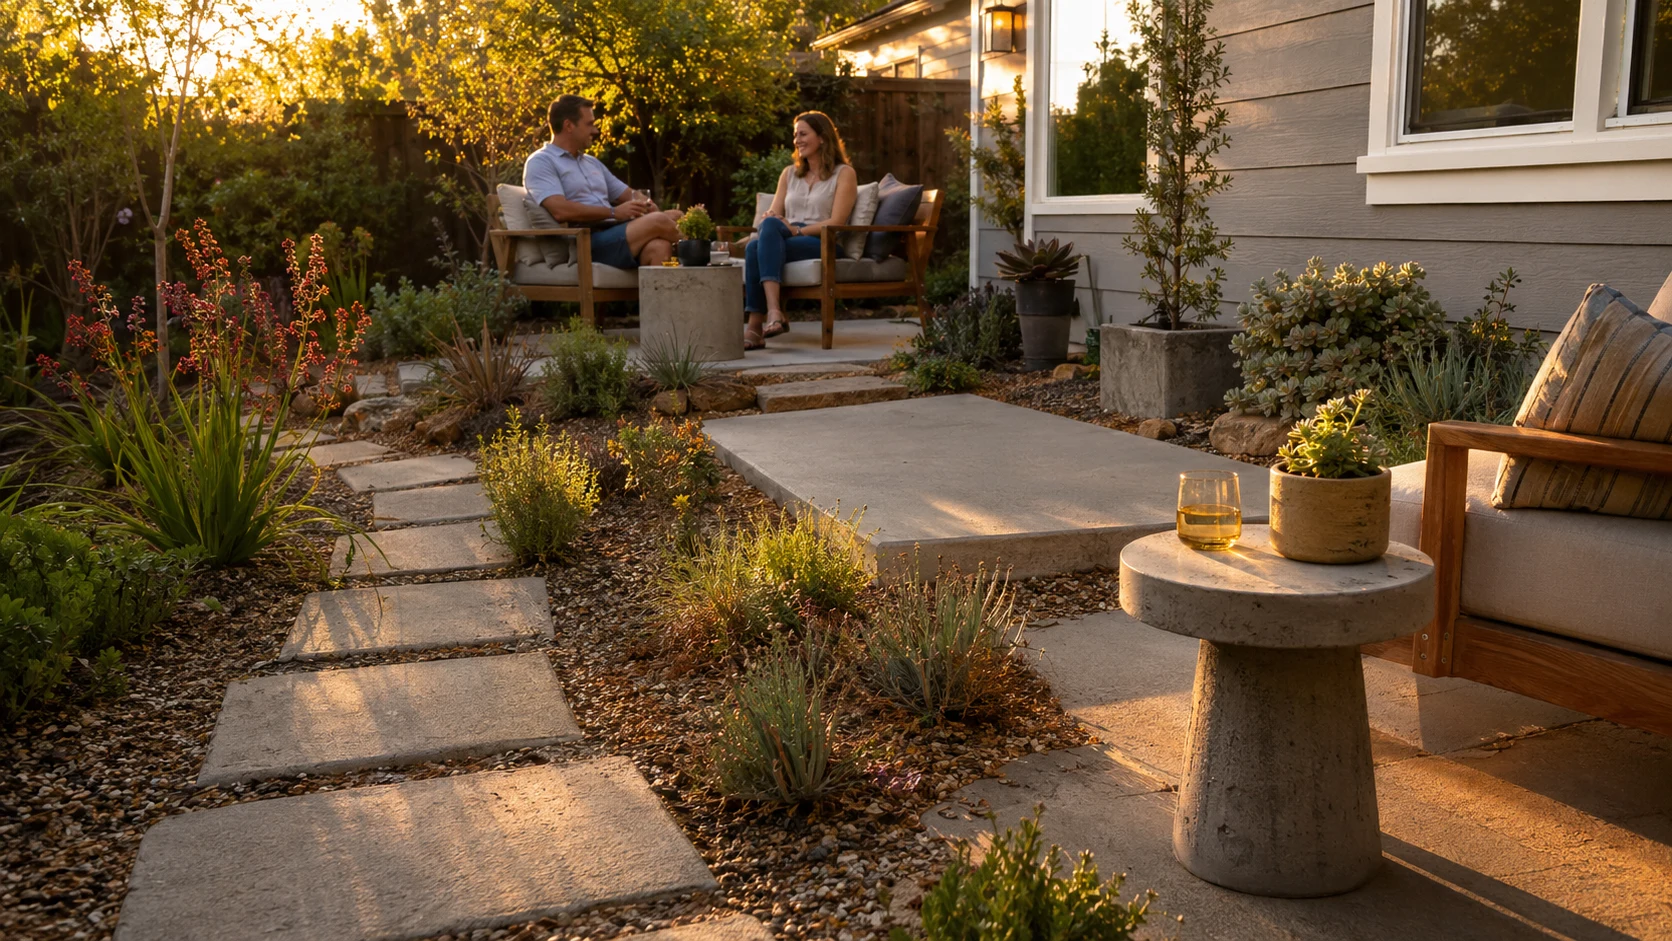
Small Concrete Stepping Stones
Stepping stones are one of the friendlier concrete projects because they can be made individually, tested at small scale, and placed without pouring a giant slab.
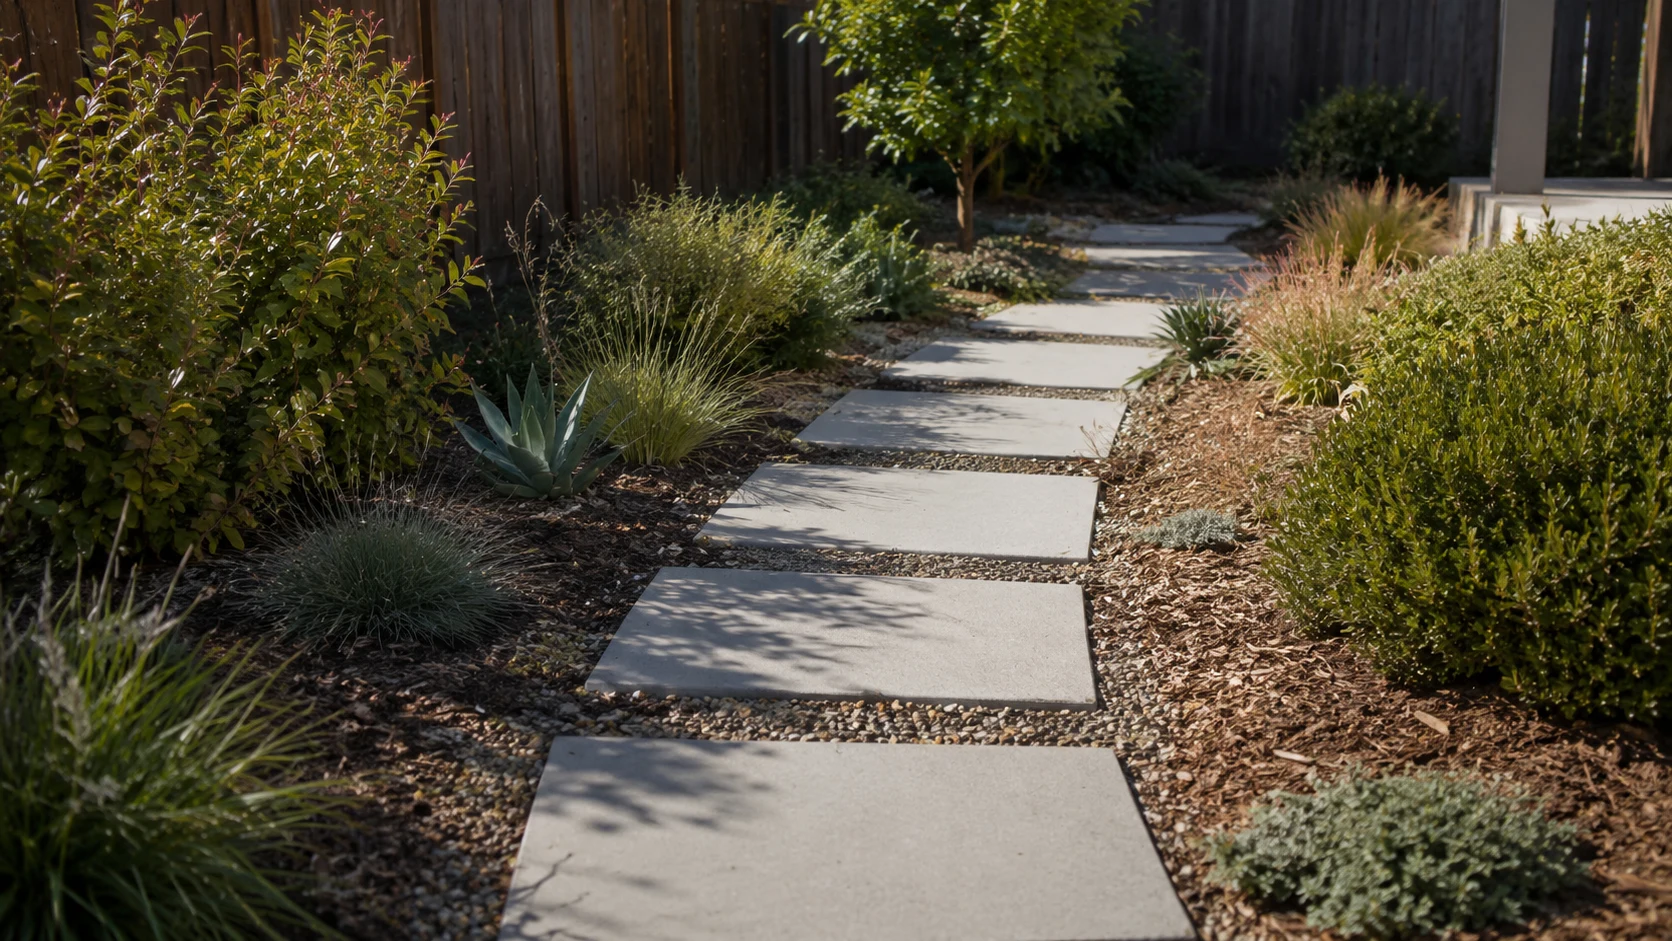
Why they work:
- Small forms or molds keep the project manageable.
- Individual pieces can be moved, adjusted, or replaced.
- They can help connect a gate, garden bed, utility area, or side yard.
- They teach mixing, forming, curing, and handling without committing to a major patio.
Difficulty: beginner to intermediate, depending on shape, thickness, finish, and placement.
What can go wrong:
- Pieces are too thin for their size.
- The mix is too wet.
- Edges chip during demolding.
- Stones rock because the base was not leveled.
- Stones are used too soon before they have enough handling strength.
- The path spacing feels awkward because nobody walked the route before placing forms.
Curing/time caveat:
You may be able to cast stones in a weekend, but do not treat them as fully ready just because the surface feels firm. Let them cure with support, handle them carefully, and follow the product guidance before regular foot traffic.
When to call a pro:
If the path is part of steps, a steep slope, drainage correction, pool access, accessibility route, or a high-traffic entry, get help with layout, base, slope, and safety.
Simple Paver Landing Or Paver-And-Concrete Transition
A small landing can make a door, gate, grill area, or side-yard turn feel more intentional. The key word is small.
Why it works:
- A modular paver area can be more forgiving than a large poured slab.
- It can bridge gravel, turf, decomposed granite, and concrete.
- It can reduce tracking near doors or create a stable spot for bins and foot traffic.
- It creates useful hardscape without pretending to be a full patio.
Difficulty: intermediate. The pavers may be simple; the base and edge restraint are where the project gets serious.
What can go wrong:
- Poor excavation leaves the landing too high or too low.
- The base settles.
- Edges spread because restraint was ignored.
- Water drains toward the house.
- The transition creates a trip edge.
- Pattern and cuts look improvised in the bad way.
Curing/time caveat:
Paver projects do not cure like poured concrete, but they still need base prep, compaction, edge restraint, and settlement-aware installation. If you pour a small concrete transition strip, that concrete still needs curing time.
When to call a pro:
Bring in help when the landing affects a doorway threshold, drainage near the house, steps, slope, accessibility, utilities, or a larger hardscape system. For the bigger surface choice, see Concrete Pavers vs. Poured Concrete for Backyard Projects.
Small Poured Pad For Bins Or Utility Areas
A small utility pad can be useful for trash bins, a hose area, a potting station, or a low-visibility service zone.
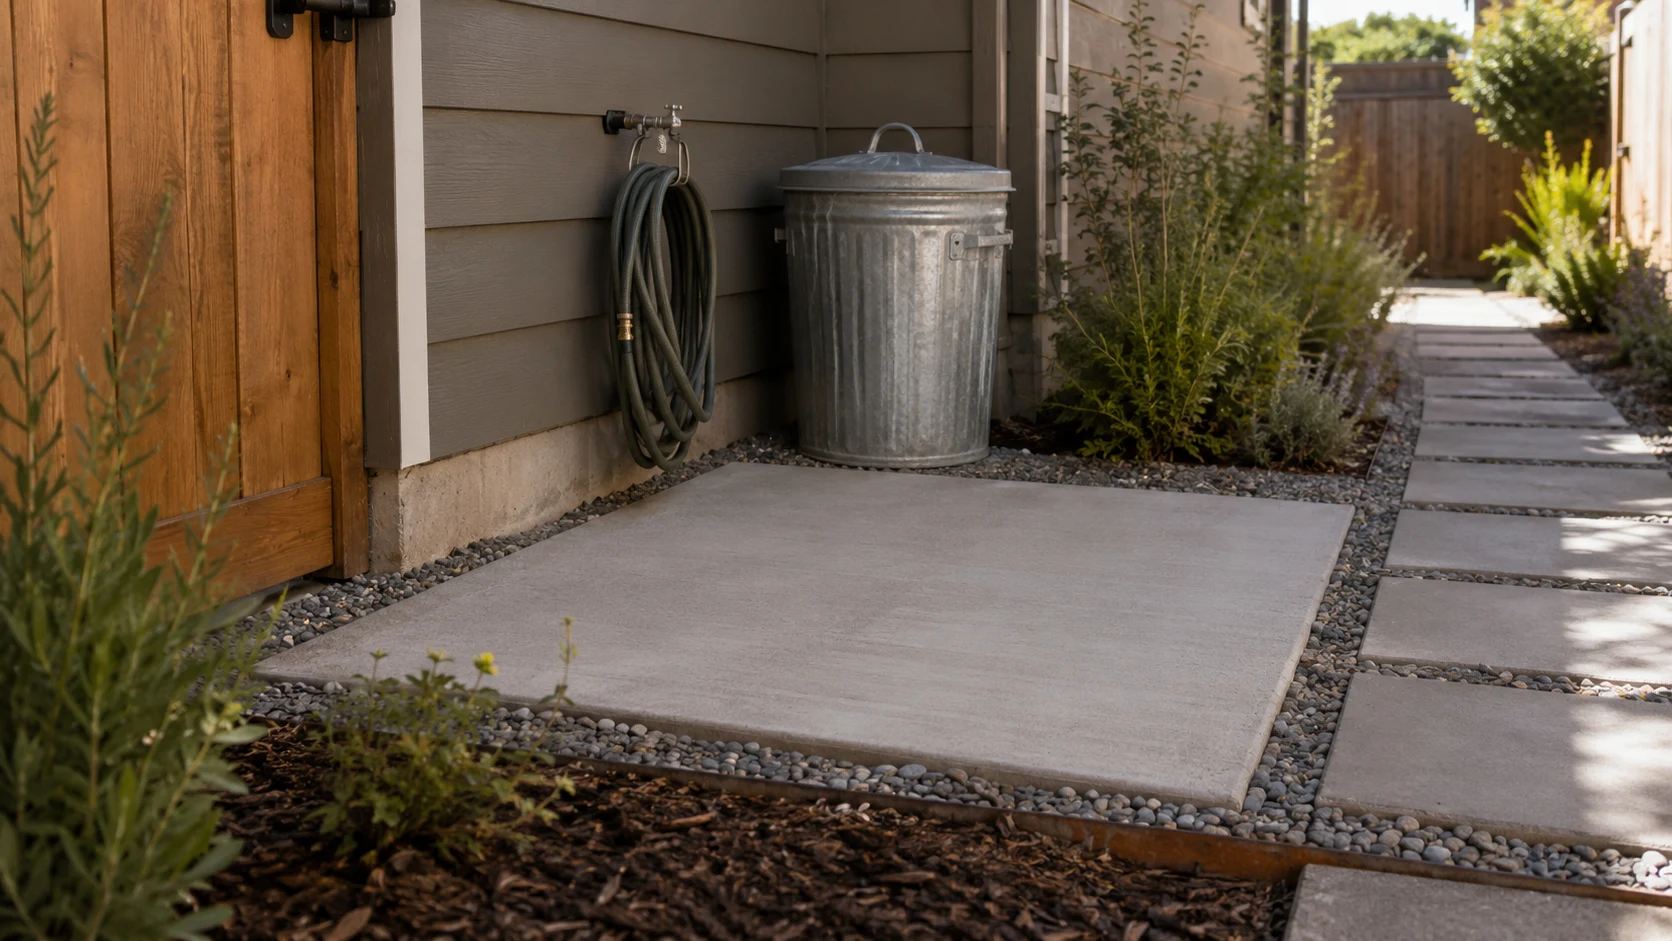
Why it works:
- The scope can stay modest.
- The appearance does not need to be fancy.
- It solves a real backyard annoyance.
- A practical broom finish can be enough.
Difficulty: intermediate, because slab work still needs base prep, forms, slope, finish timing, curing, and realistic loading expectations.
What can go wrong:
- The pad drains the wrong way.
- The base is soft or poorly compacted.
- The form is out of square or out of level.
- The surface is too smooth and slick.
- The pad is too small for the real use.
- It gets loaded too soon.
Curing/time caveat:
You may be able to form and pour a small pad in a weekend, but the pad may not be ready for bins, furniture, equipment, sealing, or regular use immediately. Use Concrete Cure Time for DIY Outdoor Projects as a planning companion, then follow the product guidance and site conditions.
When to call a pro:
Call a pro if the pad will carry heavy equipment, posts, a shed, appliances, stairs, vehicle loads, utilities, drainage work, or anything attached to the house.
Concrete Planter Or Vessel
Planters are a good way to get the concrete look without pouring a slab. They also reveal every shortcut in the mold.
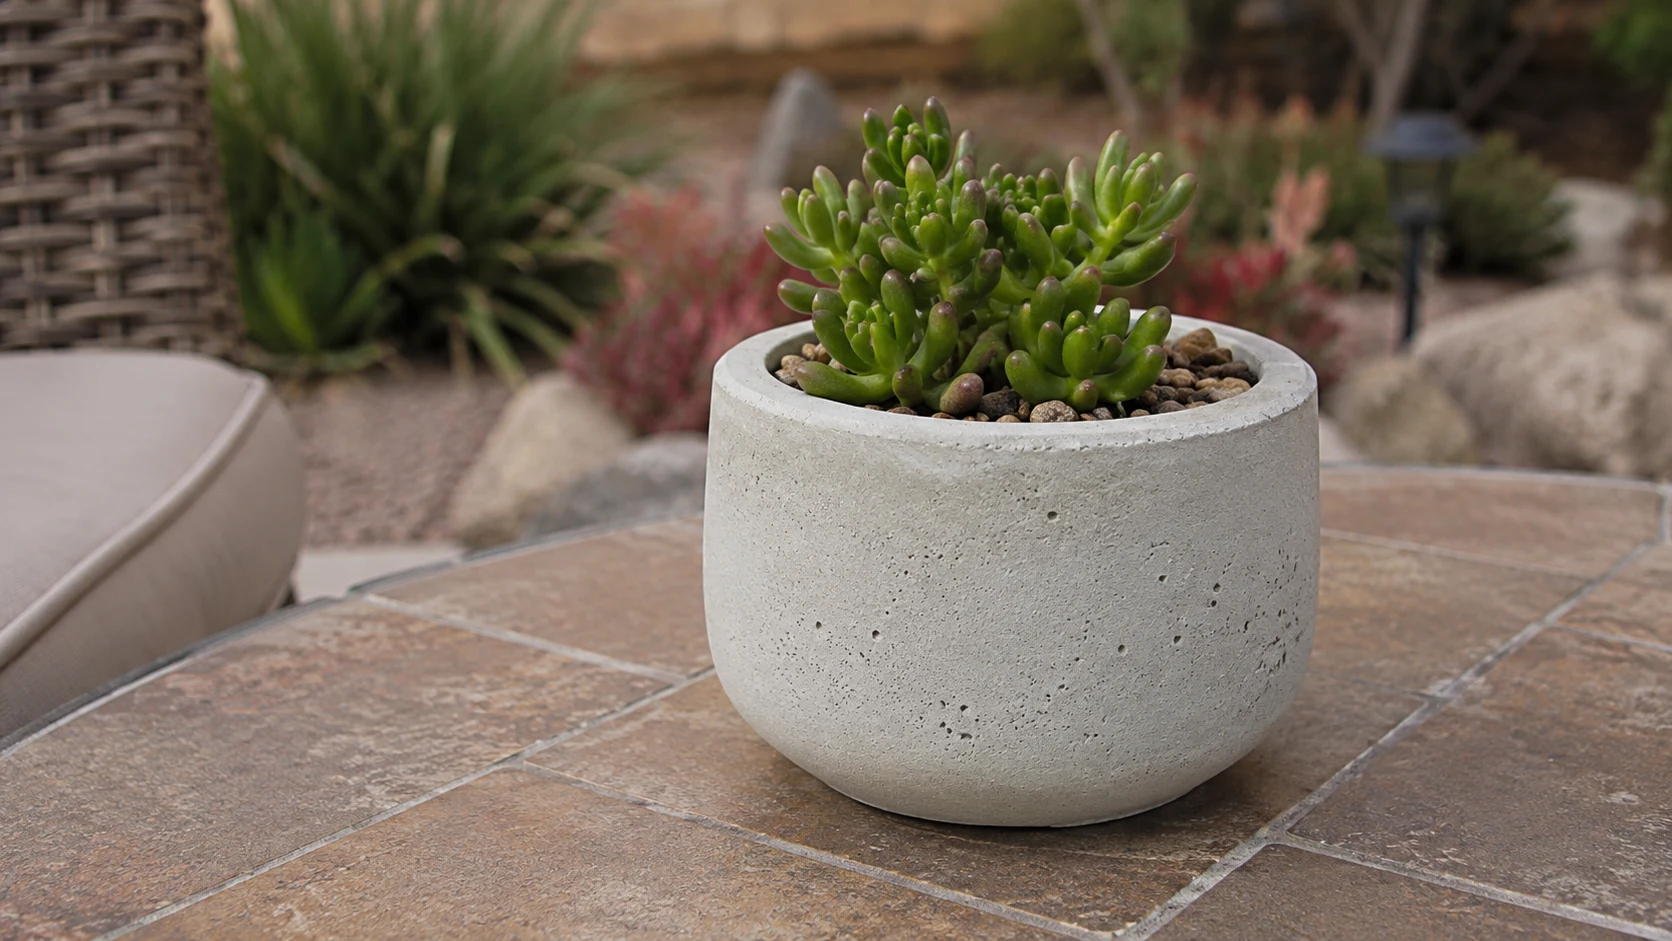
Why they work:
- Small molds keep the material quantity manageable.
- You can make test pieces.
- The project can be decorative and useful.
- A failed planter is annoying, not usually catastrophic.
Difficulty: beginner to intermediate. Simple square or round forms are friendlier than thin-walled, oversized, or highly detailed molds.
What can go wrong:
- Walls are too thin.
- The mix is too wet or too coarse for the mold.
- Drainage holes are forgotten.
- The planter cracks during demolding.
- Edges chip because the piece was rushed.
- The finished planter is too heavy to move.
Curing/time caveat:
Casting may happen in a weekend. Demolding, handling, drying, sealing, planting, or moving may not. Let the piece gain enough strength, especially around thin edges and corners.
When to call a pro:
Professional help is wise for very large planters, integrated planters near structures, balcony or roof placement, or anything where weight, drainage, waterproofing, or structural support matters.
Small Concrete Side Table Or Stool
A concrete side table, stool, or small slab-top table can look great on a patio if the form, weight, and finish are handled thoughtfully.
Why it works:
- It is a contained project.
- It can be tested with a smaller sample.
- It builds useful skills for mixing, molds, edges, finishing, and sealing.
- It can connect naturally to a future countertop project without starting with the hardest version.
Difficulty: intermediate. Weight, edges, reinforcement, curing, and surface finish matter more than the size suggests.
What can go wrong:
- The piece is too heavy to move safely.
- The top is too thin or unsupported.
- Edges chip during handling.
- The surface finish shows dust, bubbles, or poor troweling.
- The legs or base are unstable.
- Sealer expectations get ahead of curing.
Curing/time caveat:
You can pour a small table part in a weekend, but handling, sealing, assembling, and regular use may need more time. For mix thinking, start with DIY Concrete Countertop Mix Recipe. For sealing, use DIY Concrete Countertop Sealer Guide before assuming any finish is ready for real life.
When to call a pro:
Get help if the piece is large, heavy, attached, load-bearing, elevated, part of an outdoor kitchen, or likely to hurt someone if it tips, cracks, or fails.
Concrete Countertop Planning And Prep
A full concrete countertop is usually not a clean weekend build for beginners. It can be a very good weekend planning project.
Why it works as planning:
- You can measure the space.
- You can decide whether the project is cast-in-place or precast.
- You can build or test a small sample mold.
- You can research reinforcement, support, finishing, curing, and sealing.
- You can decide whether the project should be DIY at all.
Difficulty: planning can be beginner-friendly; the build is often intermediate to advanced.
What can go wrong:
- The countertop is too heavy for the base.
- The mold is not square, flat, or sealed.
- The mix is too wet.
- Reinforcement is poorly planned.
- The piece cracks during handling.
- The finish and sealer are treated as afterthoughts.
- Food-contact, heat, weather, and maintenance expectations get hand-waved.
Curing/time caveat:
A countertop may be poured in a weekend, but demolding, handling, installing, sealing, and using it safely take longer and depend on the mix, size, thickness, finish, weather, and product instructions.
When to call a pro:
Use professional help for high-use kitchens, large counters, attached outdoor kitchens, unsupported spans, commercial or rental-facing spaces, uncertain food-contact needs, or any project where the base, weight, or failure risk is not obvious.
Small Repair, Cleaning, Or Sealing Projects
Not every weekend concrete upgrade needs fresh concrete. Sometimes the better project is making existing concrete less neglected.
Why it works:
- Cleaning, small crack monitoring, stain management, and compatible sealing can improve usability.
- The project may avoid demolition and new pours.
- It can prepare a patio, path, or pad for a later upgrade.
- It helps you understand the surface before spending more money.
Difficulty: beginner to intermediate, depending on surface condition, chemicals, old coatings, and safety requirements.
What can go wrong:
- Sealer is applied over moisture, dirt, dust, oil, or old failed coating.
- A glossy finish creates slip risk.
- Harsh cleaners damage the surface or landscaping.
- Cracks are cosmetic in one area and structural in another.
- Cutting, grinding, sanding, or aggressive prep creates dust hazards.
Curing/time caveat:
Repairs and sealers have their own timing. Do not assume the surface is ready for coating, weather, foot traffic, furniture, or cleaning just because the work looks finished.
When to call a pro:
Call a pro for active cracks, lifting, settlement, spalling, drainage failures, trip hazards, old coating failure, unknown chemicals, pool-adjacent slip concerns, or any surface tied to safety, structure, or utilities. For sealer decisions, see Concrete Patio Sealer: What Homeowners Should Know.
Concrete Edging Or Border Concepts
Concrete edging can help separate planting beds, gravel areas, lawn, mulch, or paths. It can also look very homemade if the formwork, line, and finish are sloppy.
Why it works:
- The project can be narrow and contained.
- It creates structure in messy planting or gravel areas.
- It can reduce material migration.
- It can make small backyard zones look more deliberate.
Difficulty: beginner to intermediate, depending on curves, grade changes, finish, and whether the edging is poured in place or cast in sections.
What can go wrong:
- The line wobbles in a way that does not look intentional.
- The edging is too tall, too thin, or poorly supported.
- Water gets trapped behind it.
- The finish does not match the yard.
- It cracks because the base, curing, or control of movement was ignored.
Curing/time caveat:
The edging may be poured in a weekend, but it still needs curing and protection. Do not backfill, load, or abuse fresh edging too soon.
When to call a pro:
Get help if the edging affects drainage, slopes, tree roots, retaining conditions, irrigation, structures, or local rules.
Finish Refresh And Resurfacing: Be Careful
Resurfacing can sound like a shortcut: spread something over ugly concrete and pretend the past never happened.
Sometimes a surface refresh makes sense. Sometimes it is makeup over a problem that needed diagnosis first.
Why it may work:
- A compatible surface treatment can improve appearance.
- Small non-structural areas may be manageable.
- Cleaning and sealing can revive some surfaces.
- Finish choice can improve traction or maintenance when done correctly.
Difficulty: intermediate to advanced, depending on the existing concrete.
What can go wrong:
- The old concrete is moving, cracking, spalling, or holding moisture.
- The coating or overlay does not bond.
- The finish becomes slick.
- Color, texture, or sheen looks uneven.
- The prep creates dust or chemical hazards.
- The new surface fails because the old problem is still underneath.
Curing/time caveat:
Every resurfacer, coating, sealer, or repair material has its own surface-prep, weather, dry-time, cure-time, and return-to-use requirements. The label wins.
When to call a pro:
Use professional help for larger areas, active cracking, coating failure, moisture problems, slick surfaces, pool decks, stairs, drainage problems, or anything where failure would create a safety issue. For finish decisions, see Outdoor Concrete Finish Options.
Projects That Are Not Good Weekend DIY Candidates
Some projects should not be casual weekend concrete work.
Be very cautious with:
- Structural slabs.
- Driveway pours.
- Major patios.
- Retaining walls.
- Stairs.
- Pool decks.
- Elevated concrete.
- Attached structural counters.
- Fire pit tables with gas or fire integration.
- Concrete around utilities.
- Anything involving electrical, plumbing, gas, drainage, permits, local code, or load-bearing assumptions.
These are not impossible projects. They are just not "grab a bag of mix and see what happens" projects.
If a project could injure someone, damage the house, create drainage problems, violate local rules, or become expensive to remove, the weekend upgrade is the planning session, not the pour.
Practical Decision Framework
Choose the project by risk, not just excitement.
Green-Light Projects
These can be reasonable for careful DIYers:
- Small stepping stones.
- Simple decorative cast pieces.
- Small planters.
- Small test slabs or samples.
- Surface cleaning and inspection.
- Planning, measuring, and mockups.
Yellow-Light Projects
These may be DIY-friendly if the site is simple and the scope stays small:
- Small utility pads.
- Simple paver landings.
- Concrete edging.
- Small side tables or stools.
- Small repairs.
- Sealing maintenance on compatible surfaces.
Red-Light Projects
These need professional guidance or a much more serious plan:
- Large slabs or patios.
- Driveways.
- Retaining walls.
- Fire features.
- Attached counters.
- Stairs.
- Structural work.
- Drainage corrections.
- Utility-adjacent work.
- Anything with permit, code, load, gas, electrical, plumbing, or safety implications.
If you are trying to talk yourself into a red-light project because you watched a short video, that is your sign to step away from the wheelbarrow.
Common Mistakes
Avoid these:
- Calling a project weekend-friendly because the pour is quick.
- Forgetting that curing continues after cleanup.
- Choosing a project too heavy to move safely.
- Skipping base prep because the pad is small.
- Pouring in bad weather.
- Adding extra water to make the mix easier.
- Treating a decorative mold like structural concrete.
- Ignoring drainage near the house.
- Cutting or grinding without serious dust precautions.
- Sealing before the concrete or product is ready.
- Copying a project from a different climate, soil, or yard condition.
- Assuming one helper is enough for a timed pour.
- Starting a project with no cleanup plan.
Concrete projects do not fail because they lack enthusiasm. They fail because enthusiasm was asked to do the job of planning.
Weekend Concrete Project Checklist
Before you start, confirm:
- The project is homeowner-scale and non-structural.
- Failure would be annoying, not dangerous.
- The route, location, and use case make sense.
- The base, forms, drainage, slope, and curing plan are clear.
- The project can stay protected while it cures.
- The materials are manageable to lift, mix, place, and clean up.
- You have eye protection, gloves, dust protection, and product labels/SDS available.
- You know what can be finished this weekend and what must cure later.
- You are not relying on a universal thickness, reinforcement, or cure-time rule.
- You know when to call a pro.
FAQ
What concrete project is easiest for a backyard weekend?
Small stepping stones, simple planters, test slabs, and decorative cast pieces are usually friendlier than patios, countertops, or utility pads. They keep the material quantity smaller and the consequences more manageable.
Can you pour a small concrete pad in one weekend?
You may be able to form and pour a small pad in a weekend, but curing, loading, sealing, and regular use can take longer. The base, drainage, slope, thickness, weather, mix, and product guidance all matter.
Is a concrete countertop a weekend project?
Planning, measuring, building a test mold, and making samples can fit a weekend. A full countertop build often needs more time for forming, pouring, curing, handling, finishing, sealing, and safe installation.
Are concrete stepping stones beginner-friendly?
They can be, especially when the shapes are simple and the stones are thick enough for their size. The common problems are wet mixes, thin pieces, rushed demolding, poor curing, and uneven placement.
What concrete projects should beginners avoid?
Beginners should avoid structural slabs, driveways, major patios, retaining walls, stairs, fire features, attached counters, utility-adjacent work, and anything involving drainage, permits, code, gas, electrical, plumbing, or load-bearing assumptions.
Do weekend concrete projects need sealing?
Some do and some do not. Sealing depends on the project, finish, exposure, product compatibility, cure time, and maintenance expectations. Do not seal fresh concrete just because it looks finished.
Bottom Line
A good weekend concrete project is small enough to control, useful enough to matter, and honest enough to admit that curing does not end when the tools are washed.
Start with low-risk projects: stepping stones, planters, samples, small utility improvements, or planning work for something bigger. Respect weight, dust, wet concrete, weather, base prep, drainage, and cure time. Let the larger, structural, fire-integrated, utility-adjacent, or permit-sensitive work move into professional territory.
Concrete can absolutely upgrade a backyard over a weekend. Just make sure the weekend is doing the right job: starting a project well, not pretending concrete finished its part because you finished yours.