You do not have to remove every square foot of lawn to make the yard more waterwise. Sometimes the smarter move is smaller: convert the useless strip, the crispy corner, the mower-annoying edge, or the piece of lawn nobody touches except the sprinkler.
That is not compromise. That is design discipline.
Whole-lawn removal can work beautifully when the plan is strong. But a partial conversion often gives homeowners a better first win: less water pressure, more planting, more texture, and less risk of waking up to a yard that looks like the grass was deleted and the replacement file failed to upload.
This guide explains how to convert part of a lawn into a waterwise planting bed while thinking through layout, turf removal, irrigation, soil, edging, mulch, gravel, plant choice, shade, establishment, and maintenance. It is not a rebate guide, local-code guide, HOA guide, irrigation engineering spec, or universal plant list. Yards are local. Grass is dramatic. Water bills are persuasive.
The Direct Answer
The best lawn-to-planting-bed conversion starts with a small, underused lawn area that already wants to become something else.
Good first candidates include awkward mowing zones, hot edges near walls, narrow strips, unused corners, lawn beside paths, problem sprinkler areas, or grass that mostly exists because it has always existed. Keep the new bed large enough to look intentional, connect it to paths or views, edge it cleanly, update irrigation before planting, and use repeated low-water plants with mulch or gravel that fits the site.
Do not start with the family play zone, the dog's only workable bathroom route, a drainage problem, a slope, a mature-tree root zone, or an irrigation mystery that nobody understands. Those may still be solvable. They are just not the low-drama first move.
For the bigger landscape frame, How to Plan a Low-Water Backyard Without Making It Look Barren is the natural companion. This guide focuses on the smaller move: one piece of lawn becoming one useful, good-looking bed.
Why Partial Lawn Conversion Often Works Better
A partial conversion lets you keep the parts of lawn that still earn their water.
Maybe the kids use the center. Maybe the dog needs a familiar surface. Maybe a small green panel cools the patio and makes the yard feel softer. Fine. Keep the useful lawn and stop watering the decorative leftovers.
The best partial conversions do three things at once:
- Reduce the least useful turf.
- Add planting, shade, texture, or habitat value where the yard feels thin.
- Make the remaining lawn look more intentional.
That last point matters. A smaller lawn can look better than a larger lawn if it has a clean shape and a planted edge. A random shrinking patch, however, can look like the yard got a bad haircut.
Think of the remaining lawn as a shape in the design, not the default material left over after everything else happens.
Two Realistic Starting Scenarios
The Hot Fence Strip
There is a narrow strip of grass along a west-facing fence. It is hard to water evenly, annoying to mow, and brown by late summer. Nobody walks there except the person dragging the mower into a bad mood.
That strip may be a strong candidate for conversion. It could become a mulched planting bed with repeated low-water shrubs, a few grasses, maybe a small path connection, and irrigation that matches the new plants instead of spraying a fence like the fence is photosynthesizing.
The caution: reflected heat and narrow soil volume matter. Choose plants and groundcover for the actual exposure, not the dreamy version of the exposure.
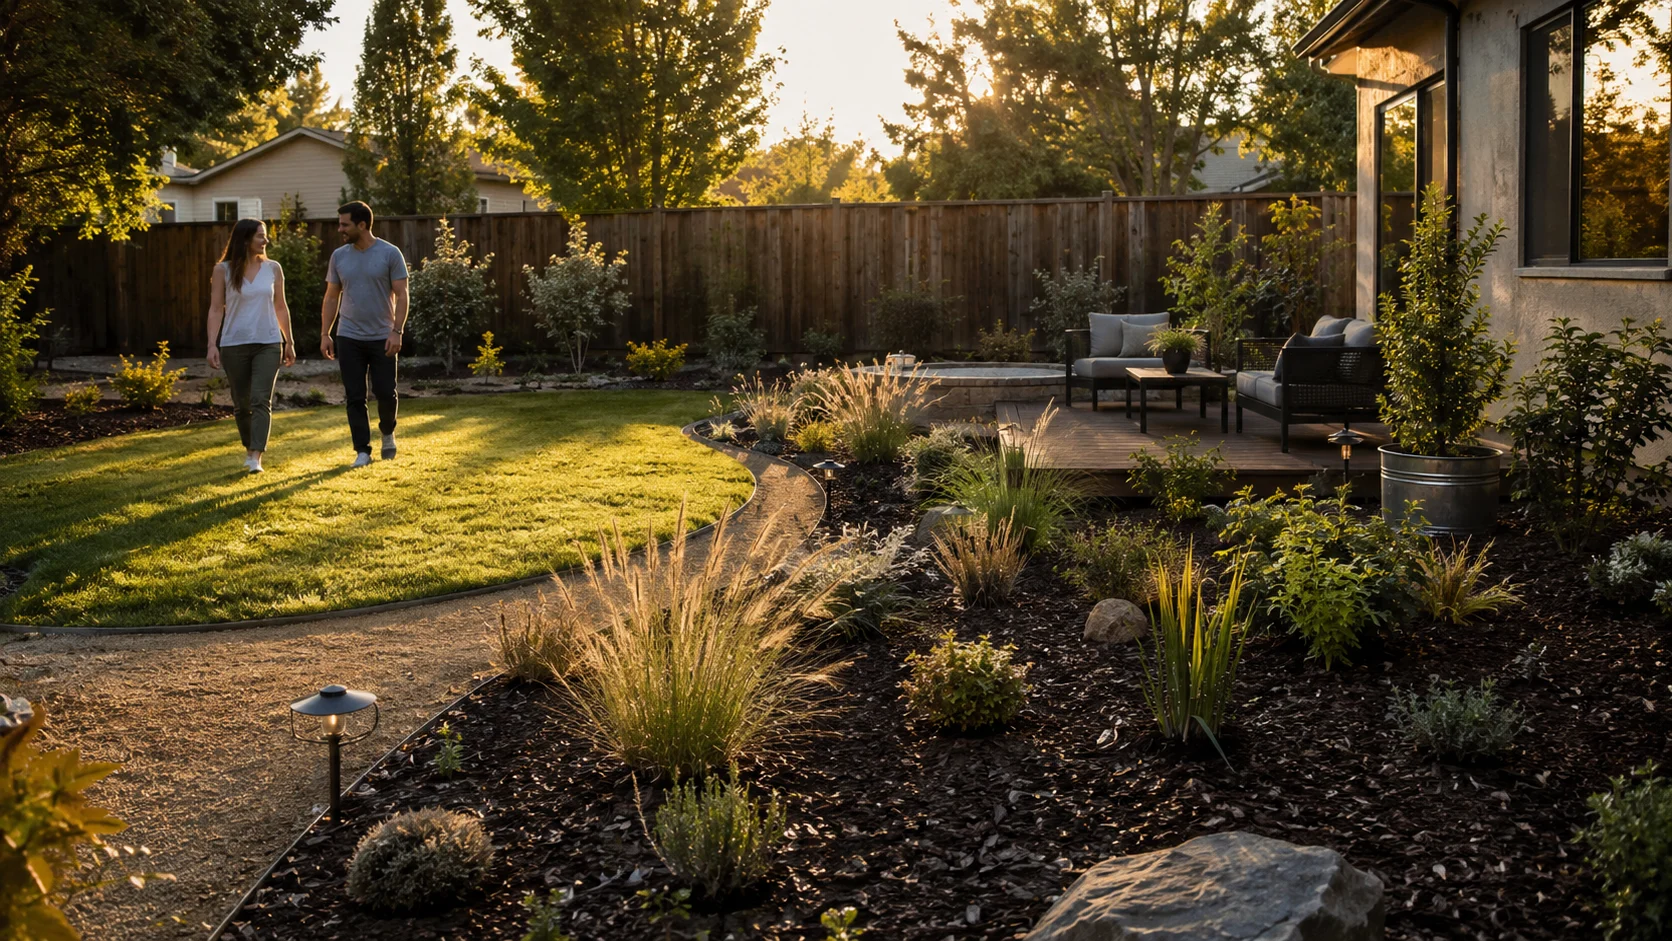
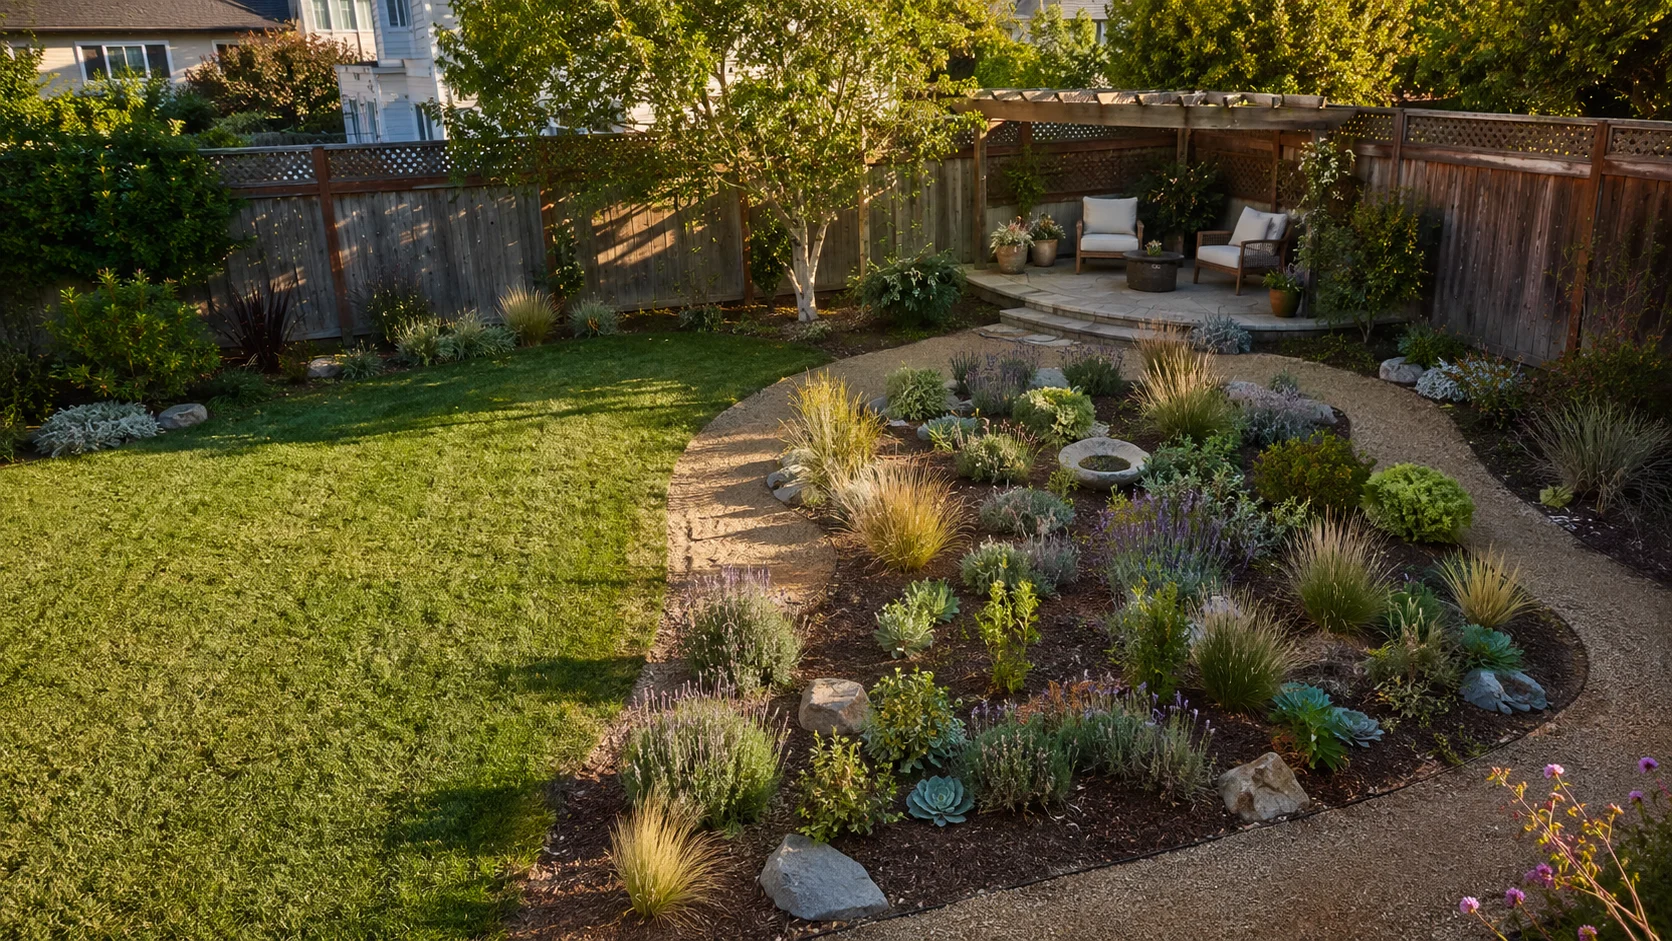
The Lawn Corner Nobody Uses
There is a back corner of lawn behind the patio. It gets water, but no purpose. The furniture faces away from it. The kids ignore it. The dog prefers another route. It is lawn as background noise.
That corner can become a layered planting bed with a small tree or tall shrub where locally appropriate, low-water plant groups, organic mulch around root zones, and a curve that makes the patio feel framed rather than stranded.
The caution: do not make the bed so small that it looks like a planter fell out of the sky. Give it enough scale to matter from the house and patio.
Choose The First Lawn Area Carefully
Start where the lawn is already failing the assignment.
Strong first candidates:
- Unused corners.
- Narrow strips that are hard to irrigate.
- Hot edges near walls or fences.
- Awkward mowing zones.
- Lawn beside patios, walkways, or gates where planting would frame the route.
- Areas that get overspray, runoff, or sprinkler inefficiency.
- Grass nobody actually uses.
- Small side-yard or front-yard areas where a cleaner planting bed would improve the view.
Pause before converting:
- High-use play space.
- Pet areas without a replacement plan.
- Drainage-sensitive areas.
- Slopes or erosion-prone spots.
- Mature-tree root zones.
- Utility corridors.
- Areas where irrigation valves, heads, or lines are unclear.
- Lawn near foundations or doors where water already behaves badly.
If the site has drainage, slope, utility, tree, or structural concerns, the first step is qualified guidance, not decorative mulch and confidence.
Shape The Bed Before You Remove Grass
Do not start by ripping out turf and then asking the exposed dirt what it wants to be. Dirt is not a designer.
Lay out the bed edge first. Use a hose, rope, marking paint, temporary flags, or even a line of stones. Then view it from the places that matter:
- The kitchen window.
- The patio.
- The main door.
- The street or sidewalk if it is front-yard visible.
- The route you take to the gate.
- The spot where people actually sit.
A good bed shape should make the remaining lawn look deliberate. It should also have enough depth for mature plants. Thin beds along fences often become sad little plant shelves. Wider beds can layer shrubs, grasses, flowering plants, mulch, and stepping access with more dignity.
Avoid making every curve too wiggly. A calm curve usually ages better than a scalloped edge that looks like the lawn is wearing a decorative pie crust.
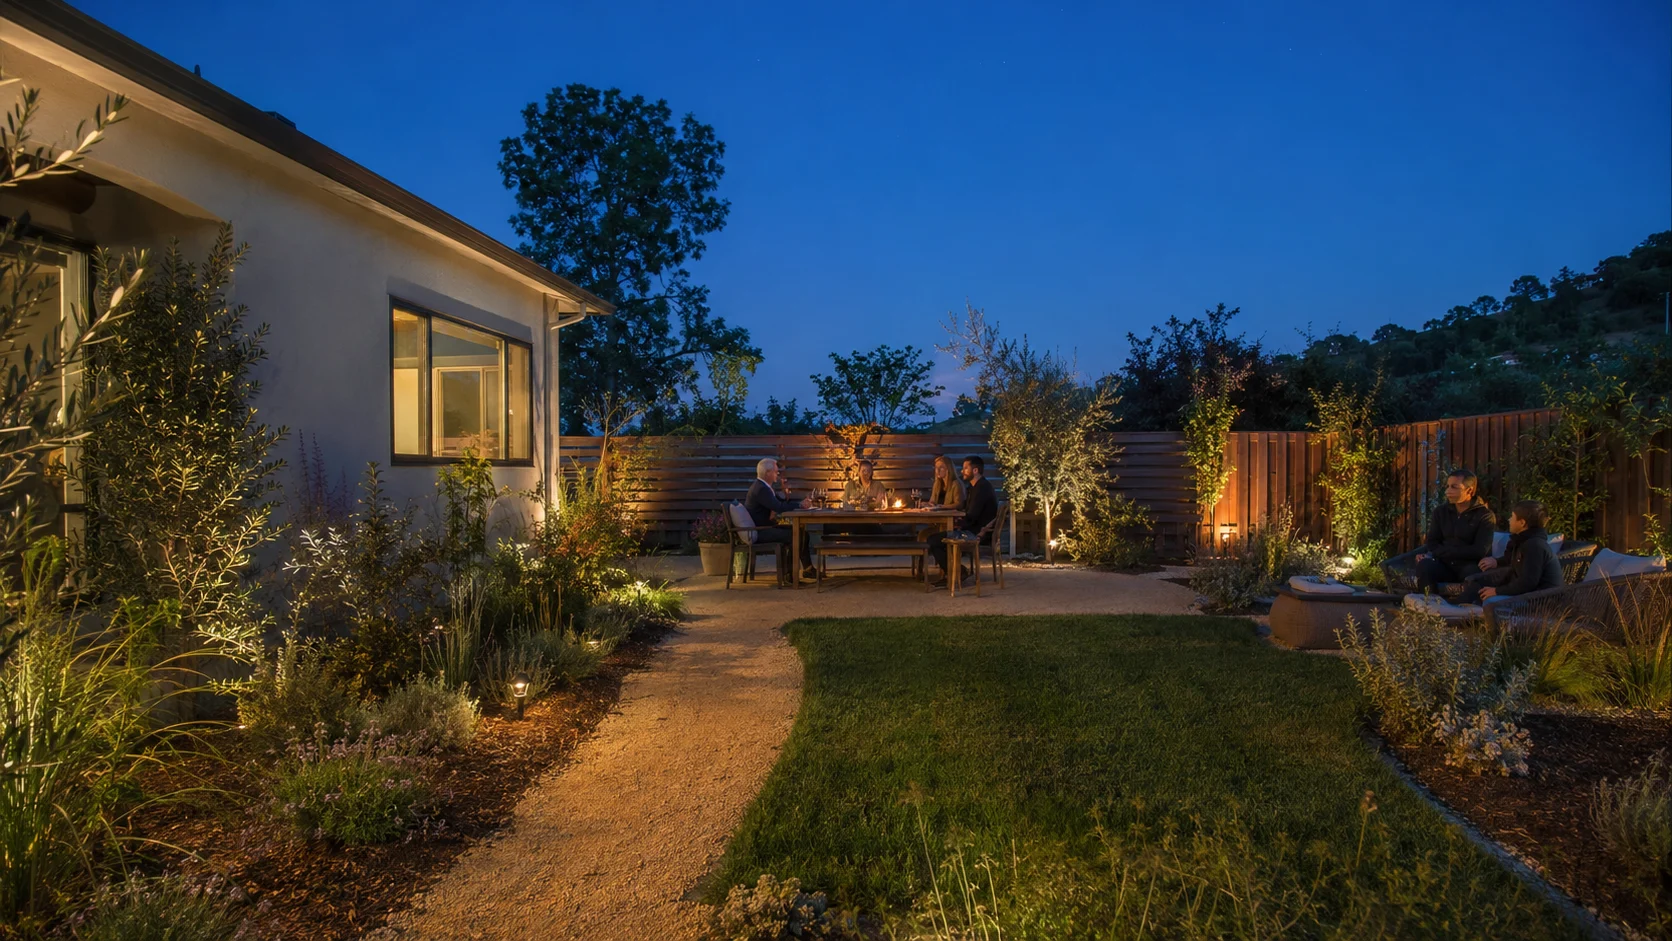
Think About Access, Views, And Maintenance
The new planting bed should improve how the yard works.
Ask:
- Can you still cross the yard naturally?
- Does the bed block a useful route?
- Can you reach plants for pruning and cleanup?
- Will the bed look good from inside the house?
- Does it frame a patio, path, tree, view, or seating area?
- Does it leave enough room for mower access around the remaining lawn?
- Will a hose, wheelbarrow, bin, or stroller still move where it needs to move?
Waterwise does not mean filling every unused inch with plants. Negative space, paths, mulch, gravel, and open lawn can all be useful. The trick is making each surface look intentional instead of accidental.
Turf Removal Options, Without The Heroics
Turf removal depends on lawn type, season, climate, local rules, budget, timeline, and how much physical work you want to donate to the yard.
Common options include:
- Physical removal. Cutting and lifting turf can be direct, but it is labor-heavy and can disturb soil. It may be practical for small areas.
- Sheet mulching. Layers of cardboard or other approved material with mulch can smother some lawns over time where locally appropriate. It takes patience and has site-specific caveats.
- Solarization. Clear plastic and heat can be used in some climates and seasons, but it is not universal and should follow local extension-style guidance.
- Professional removal. Useful for larger areas, difficult turf, irrigation changes, grading questions, or when the "small weekend job" is quietly becoming a shoulder injury with invoices.
This guide will not give herbicide instructions. If chemical removal is even on the table, follow local guidance, labels, safety requirements, and applicable rules. For many Landscapade first-25 guides, that is a good place to stop before the article accidentally becomes a chemistry manual in garden shoes.
Also check local water provider or municipal resources before major turf removal. Rebates and programs vary by location, date, eligibility, inspection requirements, plant coverage, irrigation rules, and paperwork. Do not assume money is waiting just because a neighbor mentioned it over a fence.
Irrigation Is The Part People Underestimate
The old lawn probably used spray irrigation. The new planting bed probably should not be watered like turf.
Before planting, understand what irrigation currently serves the area:
- Which valve controls it?
- Which heads water the grass?
- Are nearby lawn areas on the same zone?
- Does spray hit fences, patios, sidewalks, or future mulch?
- Can the remaining lawn still be watered efficiently after the bed changes?
- Will the new plants need drip, microirrigation, hand watering, or a separate zone?
If you are converting spray-irrigated lawn to shrubs and perennials, you may need to cap, adjust, relocate, or convert irrigation. That can get technical quickly. Backflow requirements, pressure, valves, filters, existing lines, and local rules are not things to solve by vibes.
For the plant-grouping side, read Hydrozoning Basics for Homeowners. For the irrigation basics, Drip Irrigation Basics for Low-Water Yards explains why drip is useful but not magic.
The simple rule: hydrozone first, hardware second. The yard should not be designed around whatever sprinkler head happens to be closest.
Soil And Grade Still Matter
Once grass is gone, the soil may tell you things the lawn had been politely hiding.
Look for:
- Compaction.
- Uneven grade.
- Old turf roots and thatch.
- Construction debris or fill.
- Hardpan or caliche where relevant.
- Tree roots.
- Low spots.
- Runoff paths.
- Irrigation overspray.
- Soil that stays soggy or dries hard.
New planting beds need soil that lets water enter, move, and drain appropriately for the plants. That does not mean dumping random amendments everywhere. Soil work should respond to actual site conditions and local guidance.
If the area drains toward the house, collects water, erodes, sits on a slope, or is near foundations, utilities, mature trees, or retaining conditions, bring in qualified help. A waterwise planting bed should not become a pretty cover story for a water problem.
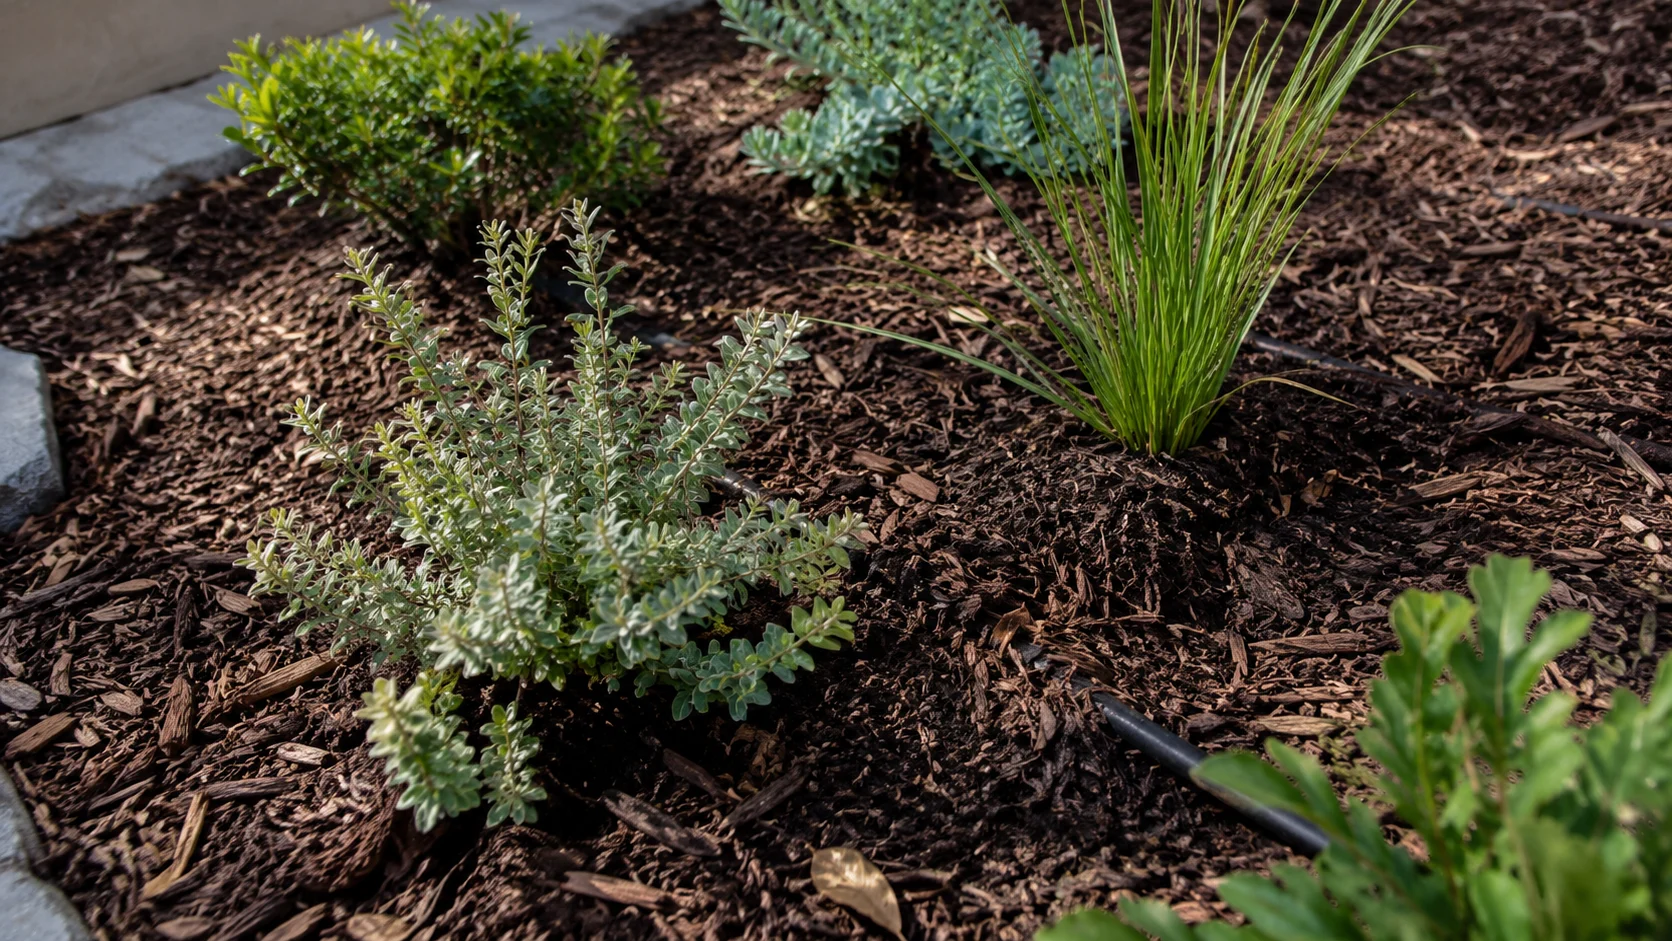
Mulch, Gravel, DG, Or Mixed Materials?
The ground layer changes the entire mood of the conversion.
Organic mulch often works well around many shrubs, trees, and perennial plantings because it protects soil, moderates temperature, and breaks down over time. It can look softer and more garden-like.
Gravel or rock can work where you need mineral texture, lower-litter surfaces, dry-climate structure, or a visual connection to paths and hardscape. It can also add heat and make future planting changes more annoying.
Decomposed granite can be useful for paths, small seating zones, and transitions, but it is not the same as all gravel. It can track, dust, soften at edges, and disappoint near busy doors if installed or placed badly.
Most strong conversions use more than one material. A planting bed might use organic mulch around plant root zones, gravel or DG for a small path, and a clean edge where the bed meets remaining lawn.
For the material decision, see Mulch vs Gravel in Low-Water Landscapes. For decomposed granite specifics, start with What Is Decomposed Granite? and How to Use Decomposed Granite Without Tracking Dust Into the House.
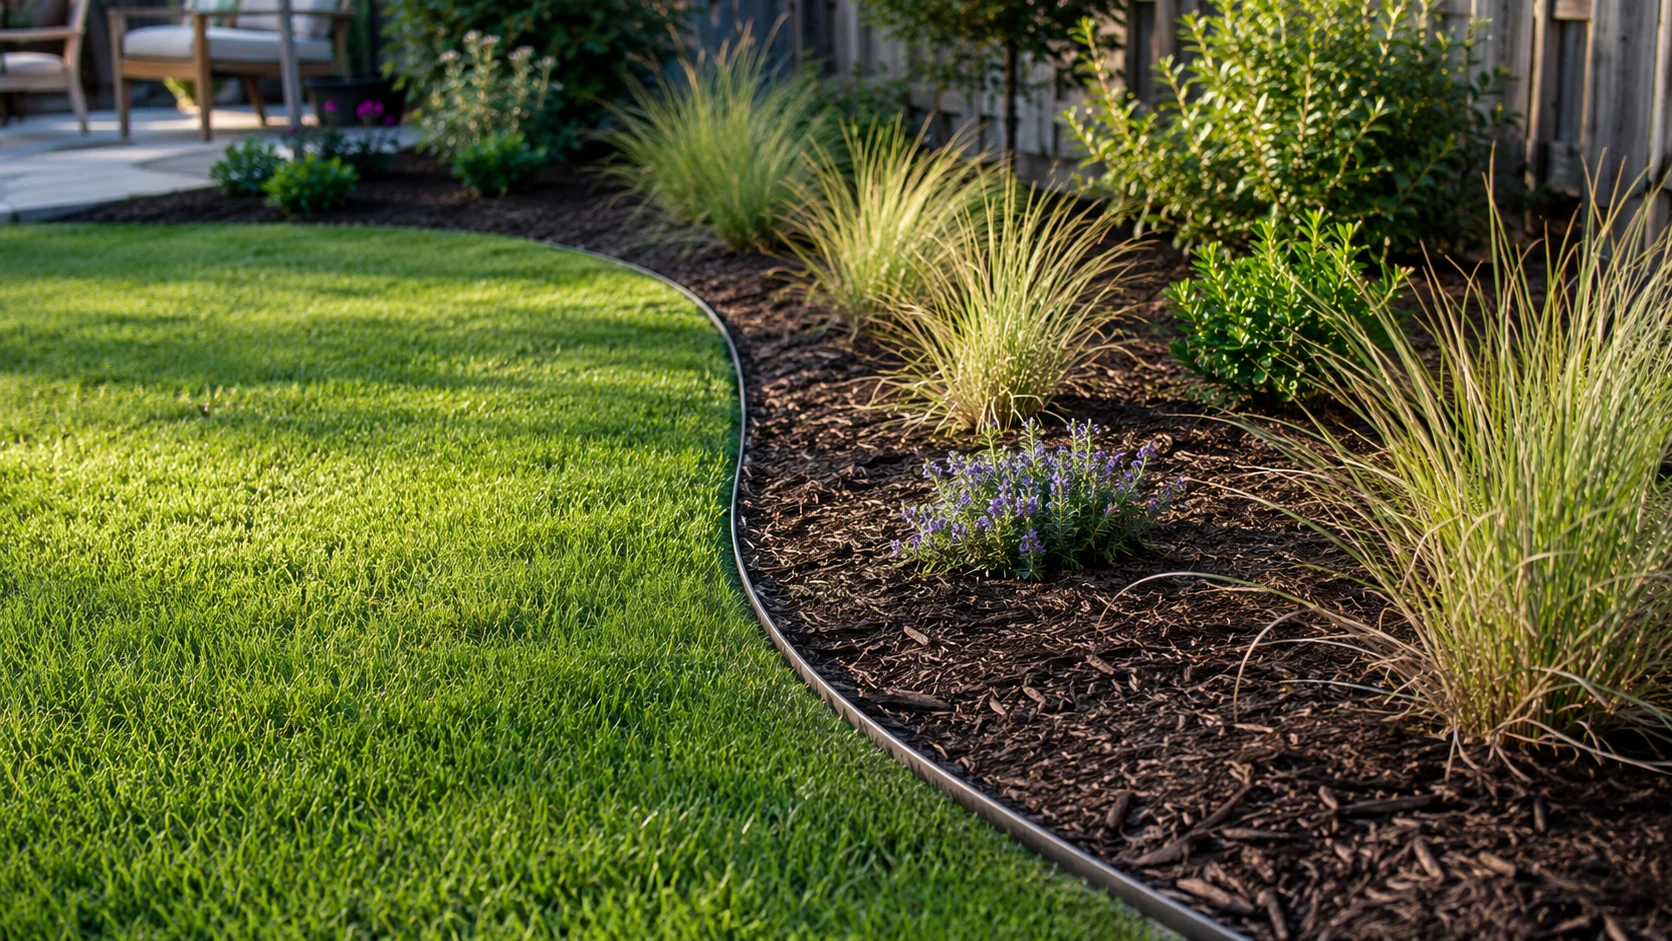
Edges Make Or Break The Conversion
A lawn-to-bed conversion needs a real boundary.
Without an edge, grass creeps, mulch drifts, gravel migrates, and the bed slowly starts negotiating with the lawn. The result can look unfinished even when the plants are good.
Options include:
- Concrete edging.
- Pavers or stone borders.
- Metal edging.
- Flexible edging.
- A hardscape path or mow strip.
- A planted transition where local conditions allow it.
Concrete edging can look crisp and intentional, especially where gravel, mulch, or decomposed granite meet planting beds. It can also create trip edges, drainage problems, or too much permanence in the wrong spot. Concrete Edging for Gravel, Mulch, and Planting Beds covers that decision in more detail.
Whatever edge you choose, think about mower wheels, foot traffic, material depth, drainage, future bed expansion, and how the edge looks from the house. A good edge is quiet. A bad edge announces every shortcut.
Plant Like You Mean It
The fastest way to make a lawn conversion look cheap is to remove grass, add empty gravel, and place five tiny plants so far apart they need a social calendar.
Use repeated plants. Use groups. Use mature size. Use layers.
A practical waterwise bed might include:
- A few low-water structural shrubs.
- Repeated ornamental grasses.
- Flowering perennials for seasonal interest.
- Succulents or agaves where climate, drainage, and exposure make sense.
- A small tree or tall shrub where shade and mature size are appropriate.
- Groundcovers or filler plants where locally suitable.
- Boulders, paths, or hardscape only where they support the layout.
Do not buy one of everything because the nursery was charming. A bed full of unrelated single plants often looks busy and still somehow empty. Repetition is what makes a new bed look designed before every plant has reached full size.
Use local extension resources, water provider plant lists, botanical garden guidance, or qualified regional professionals when choosing plants. "Low-water" in one climate may be a sulking disaster in another.
Establishment Is Not Optional
New low-water plants still need establishment care.
That may be the most commonly skipped sentence in waterwise landscaping. A plant that can use less water once established is not necessarily ready to be ignored the week after planting. Roots need time. Soil moisture needs observation. Hot, windy, reflective, or dry sites can stress new plants quickly.
Avoid universal watering schedules. They are fake precision unless they account for plant type, soil, climate, season, exposure, irrigation method, and local guidance.
Instead, watch the bed:
- Are plants wilting, yellowing, crisping, or dropping leaves?
- Is soil staying soggy or drying too fast?
- Is mulch covering soil but staying off stems?
- Is drip reaching the root zone?
- Is the old lawn irrigation still overspraying the bed?
- Are plants growing into their intended shape?
Waterwise is not neglect. It is attention with a better plan.
Common Mistakes
The predictable failures are not subtle.
Removing lawn without a design. Grass comes out fast. A good replacement plan takes longer, which is annoying and also true.
Replacing turf with empty gravel. That can reduce irrigation, but it can also create heat, glare, weeds, dust, and visual regret.
Ignoring irrigation conversion. Plants chosen for lower water still need water delivered in a way that matches their needs.
Making the bed too small. A tiny border shaved off the lawn may not change water use much or improve the yard visually. If the conversion is worth doing, give it enough scale to read.
Planting too sparsely. Plan for mature size, yes. But use repetition, grouping, and enough structure so the bed does not look abandoned for three years.
Using too many one-off plants. A waterwise bed is not a plant zoo.
Forgetting shade and comfort. If the conversion makes the yard lower-water but less usable, it missed the point. Shade in Low-Water Landscapes is worth reading before you bake the seating area.
Skipping edging. The bed needs a boundary, especially next to remaining lawn, gravel, or DG.
Pretending maintenance disappears. The new bed will still need weeding, irrigation checks, pruning, mulch refreshes, plant replacement, and seasonal cleanup. It should be less wasteful, not imaginary.
A Practical Homeowner Checklist
Before you remove a single square of turf, walk through this:
- Pick a lawn area that is unused, inefficient, awkward, or visually weak.
- Protect high-use lawn, pet zones, play areas, mature trees, slopes, drainage-sensitive spots, and utility areas unless you have a real plan.
- Lay out the bed shape and view it from the house, patio, street, and main paths.
- Decide how people will move around and maintain the new bed.
- Identify the existing irrigation zone before turf removal.
- Plan hydrozones and irrigation changes before planting.
- Check soil, grade, compaction, roots, runoff, and drainage.
- Choose groundcover based on plants, heat, maintenance, doors, pets, and paths.
- Choose an edge that works with mowing, walking, drainage, and future changes.
- Use repeated, regionally appropriate plants with similar water needs.
- Plan establishment care instead of assuming low-water plants can fend for themselves.
- Check local water provider, extension, HOA, rebate, or program requirements before major work.
FAQ
Is it better to remove all lawn or just part of it?
It depends on how the lawn is used. Removing part of a lawn can be smarter when some turf still has a real job, such as play, pets, cooling, or visual relief. Start with the least useful or least efficient lawn area and let the remaining turf become more intentional.
What is the easiest lawn area to convert first?
Often, the easiest first area is an unused corner, narrow strip, hot fence edge, awkward mowing zone, or sprinkler problem area. Avoid starting with slopes, drainage problems, mature-tree root zones, high-use play areas, or pet areas unless you have professional guidance or a solid replacement plan.
Can I convert lawn to a planting bed without changing irrigation?
Sometimes small hand-watered beds are possible, but many conversions need irrigation changes. Existing lawn spray zones may not fit shrubs, perennials, trees, or low-water plants. Before planting, understand the existing valve, spray heads, remaining lawn needs, and whether drip or another approach is appropriate.
Should I use mulch or gravel after removing lawn?
Use the material that fits the plants and the location. Organic mulch often works well around many shrubs and trees because it protects soil and moderates temperature. Gravel or decomposed granite can work for paths, transitions, or dry-climate structure, but it can add heat and tracking problems in the wrong spot. Mixed materials often look and perform better than one blanket material everywhere.
Do low-water plants need watering after planting?
Yes. Many low-water plants still need establishment care while roots grow into the surrounding soil. The right approach depends on plant type, soil, exposure, season, climate, and irrigation method. Use local guidance and observe the plants rather than following a universal internet schedule.
Do lawn-conversion rebates apply everywhere?
No. Rebates and turf-removal programs vary by water provider, city, region, date, eligibility, inspection rules, plant coverage, irrigation requirements, and paperwork. Check local program details before starting. Do not design the whole project around a rebate rumor.
Bottom Line
Converting part of a lawn into a waterwise planting bed is often the most sensible first step toward a better yard.
Keep the lawn that earns its place. Replace the pieces that waste water, look awkward, or do nothing for how the yard feels. Plan the bed shape, irrigation, soil, edge, groundcover, and planting before the grass comes out.
The goal is not a yard with less lawn for its own sake. The goal is a yard that uses water more intelligently and gives you more beauty, shade, texture, and usable space in return.